Free Software -- Plenty of It
I was reading a post on another ham radio blog about free software. It occurred to me that a lot of people probably aren't aware of the
OpenCD project. This single disk image has favorites like OpenOffice, Firefox, Thunderbird, and the GIMP. But it also has programs like Audacity, NVU, and plenty more. On top of that, the CD acts as a live Linux disc, so you can boot Linux or install your favorites on Windows, depending on your mood.
Good stuff!
Labels: linux, software, windows
Submit to:
 Del.icio.us |
 Digg |
 Slashdot |
 Diigo
Diigo
Musings on Old Computers and Flexowriters
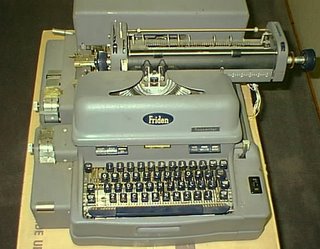
I was reading
this post the other day and it made me think of the various computers I've owned. A homebrew COSMAC Elf (1802), a TRS-80 model 3, a Data General Nova 1200 Jumbo (yes, I had it my garage for years), and a slew of PCs and other lesser computers.
Makes me a little sad, however. My kids will simply recall which PCs they owned. I don't think any of my kids have any recollection of anything less than a Pentium! While PCs today are very exciting, I can't help but wonder if most of the upcoming generation will never know the thrill of interfacing a
Friden Flexowriter to a computer (yes, I had one of those too).
I once spent some time wandering in a mall and saw a booth offering "computerized handwriting analysis." The box was full of blinking lights and there was a slot with some buttons underneath but no keyboard or screen (this was back in the late 70s, so the general public wouldn't find that odd). Upon receipt of a dollar, the man would take a slip of paper that you'd written on, fit it to the slot, push a button and you'd hear mechanical clacking as the machine sucked up the paper. When the paper emerged again, it had some "fortune cookie" saying on it.
I kept studying the machine from a distance, certain it looked familiar. Suddenly it hit me. The machine was a hood covering a Flexowriter! Beneath the hood was an endless loop of paper tape with a few "cookies" surrounded by line feeds and ending with a stop code. So when you put the paper in and pressed "read tape" the platen would turn, a message would print and the paper would eject out the other side until the stop code was read at which point the tape was positioned for the next victim--um, customer.
Those days, I suppose, are long gone.
Labels: old computer
Submit to:
 Del.icio.us |
 Digg |
 Slashdot |
 Diigo
Diigo
Six Free Software Titles
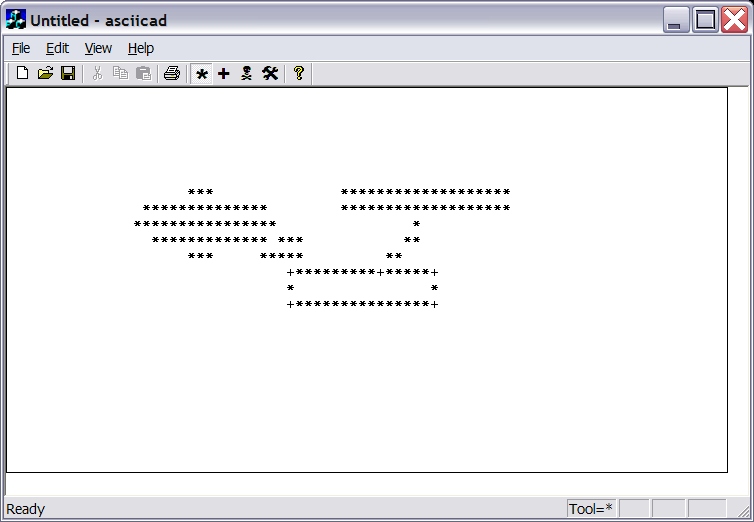
Over the years I've written a lot of software and I've given away a good bit of it. Here's some of what I have scattered around my Web sites for free download:
Bid Time - Computes eBay end times to local time.
AWC Dial- Dial the phone using the modem and TAPI. Includes a call timer.
ASCIICad - Draw with ASCII text
SCBIND - Compile shell scripts to encoded executables (Unix/Linx/Cygwin) [[I have a new version of this I need to package up and release -- if you are really going to use it, ask me]]
Stamp I emulator - see
http://www.al-williams.com/awce/bs1emu.htmFconvert - Convert between floating point, IEEE, Microchip and PAK formats - see
http://www.al-williams.com/awce/fconvert.zipThe most widely-distributed software I've probably ever written was PSKGNR, the once popular PSK31 add on program for Ham radio operators. However, PSKGNR is a relic now, replaced by all-in-one programs. But it was fun while it lasted!
Labels: linux, software, windows
Submit to:
 Del.icio.us |
 Digg |
 Slashdot |
 Diigo
Diigo
Fixing Cygwin & MingW
I'm a long-time
Cygwin user (and a longer-time Unix and Linux user). It is handy to have the whole suite of Linux tools under Windows. Of course, one feature every Linux programmer uses constantly is gcc -- the Gnu C compiler. However, the Cygwin compiler by default creates binaries for use with Cygwin. That means you need a commercial license to distribute them and it also means you can't just send an executable to your buddy who doesn't use Cygwin.
There is a another project that allows gcc to run under Windows called MingW. In fact, you can use the Cygwin tools to install the MingW libraries and -- in theory -- a simple -mno-cygwin command line option will let you compile Ming binaries (that is, normal Windows executables that don't depend on Cygwin). Of course, you lose any "special" Cygwin features when you do this, but that's the price.
I've used this before, but unfortunately it seems to be broken in the current release of Cygwin. Here's what I did to fix it.
1) In /usr/lib/gcc there is a directory for i686-pc-mingw32/3.4.4. In that directory, the Cygwin installer put ordinary .lnk files linking back to /usr/lib/gcc/i686-pc-cygwin/3.4.4. None of these work, so the first step is to make hard or symbolic links to the correct files. For example, cc1.exe.lnk needs to be fixed (from the i686-pc-mingw32/3.4.4 directory):
ln ../i686-pc-cygwin/cc1.exe cc1.exe
Fix all the links in this way. Now gcc will run with -mno-cygwin, but it still won't link.
2) The problem is, gcc is a driver and the specs file is broken. In the same directory, edit the file named specs. The trick here is we need to change the references to crt2.o to refer to a specific path (/usr/lib/mingw/crt2.0). We also need to add -L/usr/lib/mingw to several places. Here's a diff between the standard specs file and mine (significant additions in red):
$ diff specs ../../i686-pc-cygwin/3.4.4/specs
 51c51
 <   %{pg:-lgmon}   %{!mno-cygwin:-lcygwin}   %{mno-cygwin:%{mthreads:-lmingwthrd -L/usr/lib/mingw} -lmingw32}   %{mwindows:-lgdi32 -lcomdlg32}   -luser32 -lkernel32 -ladvapi32 -lshell32
 ---
 >   %{pg:-lgmon}   %{!mno-cygwin:-lcygwin}   %{mno-cygwin:%{mthreads:-lmingwthrd} -lmingw32}   %{mwindows:-lgdi32 -lcomdlg32}   -luser32 -lkernel32 -ladvapi32 -lshell32
 54c54
 < %{mno-cygwin: %{mthreads:-lmingwthrd} -lmingw32} -lgcc           %{mno-cygwin:-lmoldname -lmingwex -lmsvcrt -L/usr/lib/mingw}
 ---
 > %{mno-cygwin: %{mthreads:-lmingwthrd} -lmingw32} -lgcc           %{mno-cygwin:-lmoldname -lmingwex -lmsvcrt}
 57c57
 <   %{shared|mdll: %{mno-cygwin:dllcrt2%O%s}}  %{!shared: %{!mdll: %{!mno-cygwin:crt0%O%s} %{mno-cygwin:/usr/lib/mingw/crt2%O%s} %{mno-cygwin:-L/usr/lib/mingw}  %{pg:gcrt0%O%s}}}
 ---
 >   %{shared|mdll: %{mno-cygwin:dllcrt2%O%s}}  %{!shared: %{!mdll: %{!mno-cygwin:crt0%O%s} %{mno-cygwin:crt2%O%s}  %{pg:gcrt0%O%s}}}
Now you are done. Want to prove it? Try making a file howdy.c:
#include
void main() {
printf("Howdy!\n)";
}
Now compile it without using cygwin:
gcc -o howdy.exe -mno-cygwin howdy.c
Sure it works, but how do you know it isn't using Cygwin? Try this:
objdump -p howdy.exe | grep dll
You'll see:
$ objdump -p howdy.exe | grep dll
DLL Name: msvcrt.dll
DLL Name: KERNEL32.dll
If you recompile without the -mno-cygwin option and rerun objdump, you'll see the executable now relies on cygwin1.dll!
Notice that if you want to build DLLs you probably have to fix the dllcrt2.o in the spec file the same way. But from here you should be able to figure it out!Labels: cygwin, linux, Tips, windows
Submit to:
 Del.icio.us |
 Digg |
 Slashdot |
 Diigo
Diigo
Getting Started with Programmable Logic
If you've never worked with CPLDs or FPGAs, it can be quite a steep learning curve to get started. Why bother? Programmable logic lets you build real circuits on silicon instead of simulating them with a microprocessor. For example, suppose you want to build a super alarm system with 100 inputs. With a microprocessor, you'd have to examine all the inputs (probably in groups of 8 or 16 or 32) which means while you are examining one set of inputs, the others aren't being examined. Sure, you could use interrupts, but even then, you'll only really "see" one input at a time and respond to it.
With programmable logic, you can literally look at 100 inputs in parallel and take action on them rapidly. That's because a programmable logic chip produces dedicated hardware that you can reconfigure, not a software simulation.
A while back I put together
some slides for the local ham radio club about how to get started with programmable logic. It isn't very in depth (but there are some links to tutorials in it), but it is a good starting point.
By the way, I'm using the excellent
ThinkFree Office Online to publish these slides here. Pretty cool, huh?
Labels: electronics, fpga
Submit to:
 Del.icio.us |
 Digg |
 Slashdot |
 Diigo
Diigo
Super Etch-A-Sketch
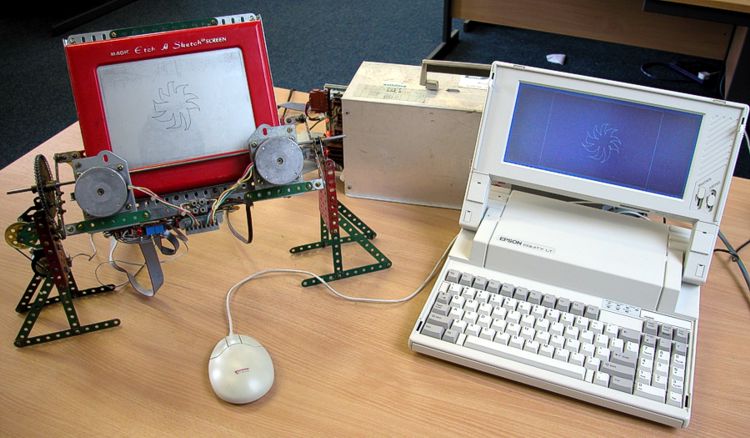
To paraphrase RFK, "Some people see a project like this and think why? I see a project like this and think why didn't I do that?" Neil Fraser did it. He hooked a
PC up to an Etch-A-Sketch. But he didn't stop at just twisting the knobs. Oh no, this rig can turn the unit over and shake it to erase!
Pretty cool if you ask me. His site has some other neat toys like an automatic combination lock opening device (but don't worry, it won't work if the lock is attached to something).
Oh yeah, and here's the fine print:
The Etch A Sketch product name and the configuration of the Etch A Sketch product are registered trademarks owned by The Ohio Art Company.
Labels: funny, geek
Submit to:
 Del.icio.us |
 Digg |
 Slashdot |
 Diigo
Diigo
Top Thunderbird Tricks
Ok, not hardware related, but you have to keep up your geek reputation, right? So here's some Thunderbird tricks you can teach your friends:
- Stacked View Extension - Lets you have a nice stacked view like other mail readers.
- Create a template folder if you don't have one already. You can make "boilerplate" e-mails and save them in the template folder. When you want to create a new e-mail, right click on the template you want to use and select "Edit as New". (Note: Look in Tools | Account Settings | Copies and Folders to see the name of the Template folder or to change it).
- In Tools | Account Settings | Composition and Addressing and select HTML editor. Even if you don't want to send HTML, you can still use the editor which is nicer and understands URLs. Change to text by using Options | Format or by programming text-only domains in Tools | Options | Send Options.
- Tired of a white background? Use Format | Page Colors and Backgrounds to set a color or picture. Save it as a template!
- If you keep a lot of mail in your Inbox look at the bottom of the list. Spam! Try selecting the folder and select View | Sort By | Order Received and click Descending. This will show you mail in the order it arrives regardless of the date in the e-mail (which may be ahead or behind your clock, especially for Spam).
- Another good extension: QuoteCollapse. This handy applet collapses long quoted messages to a single line that you can expand.
- Learn to use Smart Folders (save searches as virtual folders).
- Lots of advanced customizations at http://nightlybuild.at.infoseek.co.jp/help/tips.html
What's your favorite Thunderbird tip? It seems like there aren't as many extensions for Thunderbird. What are your essential extensions?
Labels: Tips
Submit to:
 Del.icio.us |
 Digg |
 Slashdot |
 Diigo
Diigo
Make your Own Printed Circuit Boards
Just added to the
articles section - make printed circuit boards using a laser printer.
Labels: article, electronics, pcb
Submit to:
 Del.icio.us |
 Digg |
 Slashdot |
 Diigo
Diigo
Processor Open Source
As I've mentioned, I like designing CPUs in Verilog for FPGAs. I've seen Sun's major release of some of its SPARC products, but always thought they'd be too large for typical FPGAs.
However, I notice the
MicroSPARC source is available -- might have some promise. Of course, there are plenty of "amateur" cores at
http://www.fpgacpu.org and
http://www.opencores.org if you aren't inclined to design your own.
Labels: cpu design, fpga
Submit to:
 Del.icio.us |
 Digg |
 Slashdot |
 Diigo
Diigo
Learn Electronics the MIT Way
Want to take an electronics course at MIT? Don't pack up, mortgage the house, and move to Massachusetts! Just download the
MIT course on basic electronics. This is part of their Open Courseware initiative I've written about before. Of course there's no instructor support and no credit, but it sounds like a good class if you want to know more about electronics. From the site:
Subject 6.071 Introduction to Electronics provides undergraduate students with both a basic and practical understanding of electricity and electronics. The emphasis is on applications rather than theory. Consequently there is a strong hands-on component to the subject to enable students to gain practical experience. Topics covered in the subject include:
* DC and AC circuits
* Diodes, transistors, operational amplifier
* Analog and digital electronics
* Detectors and transducers
* Electronic control
* Signal processing and noise
The focus of the subject is understanding the critical issues involved in assembling and using an array of electronic equipment to carry out various missions. Thus, there is more emphasis on the application as opposed to design.
The breadth of topics covered in 6.071 makes this a good choice for those intending to take only one subject in electronic
Join this up with a free circuit simulator (I've talked about some of these before):
Let me know how you like it!
Labels: education, electronics
Submit to:
 Del.icio.us |
 Digg |
 Slashdot |
 Diigo
Diigo
Seven Web 2.0 Flash Sites
You think of Web 2.0 sites as using dynamic HTML and AJAX. But I've noticed a growing number are using Flash for... well... um... flashy Web sites. Here's a few:
Labels: Tips, webapp
Submit to:
 Del.icio.us |
 Digg |
 Slashdot |
 Diigo
Diigo
More on my Homebrew CPU
I've mentioned the homebrew CPU on the Spartan 3 board I've been building for the last year. The internal architecture is sort of "old school" -- internally there is a 16-bit bus connecting all the processor resources. Fixed logic handles all the operations (that is, it isn't microcoded).
I call it Spartan Blue because it is very loosely based on "Blue" the CPU used as a learning tool in Caxton Foster's excellent (but dated) Computer Architecture text book. However, Spartan Blue is a lot more advanced than Blue. My version incorporates indexing, a stack, conditional skips, and several other "advanced" features. All instructions complete in one "super cycle" or less (short instructions restart the super cycle; all of the original Blue's instructions finished in one or two super cycles).
I don't know if anyone ever built a real "Blue" machine -- I know the book has a few errors in it. And my design is different enough that it isn't really "Blue" at all. But you have to wonder if anyone ever made a faithful reproduction of Foster's machine.
For the assembler I originally started writing it in awk. However, that proved too limiting so I had it autoconverted into Perl and then continued writing it in Perl. This allows for constant expressions and several other features. I recently "discovered" that Perl has long shipped with perlcc which lets you compile your Perl program to an executable. A shell script calls the C preprocessor before it launches the assembler, so overall it is a pretty powerful system without much work.
Here's part of the monitor software:
call print_msgcr+CODEOFFSET ds "Blue Monitor 0.4\xFF"prompt: call print_msg+CODEOFFSET ds "\r\r\nBLUE> \xFF"prompt0: call waitcharecho+CODEOFFSET JMPIF(lf+CODEOFFSET,prompt0+CODEOFFSET)More later.
Labels: cpu design, fpga
Submit to:
 Del.icio.us |
 Digg |
 Slashdot |
 Diigo
Diigo
Similar Blogs
I'm always surprised at how few blogs talk about the things I'm interested in (FPGAs, ham radio, etc.). Sure, there are plenty of Internet blogs and some that are just "geeky" but I suspect the number of people with my exact set of interests is pretty small.
However, a quick search turned up a few:
There are others, of course, but those are some that I've looked at at least twice. Where are you reading geek discussion? Post a comment and let me know.
Update: I just found a
directory of ham radio blogs. Interesting!
Labels: geek
Submit to:
 Del.icio.us |
 Digg |
 Slashdot |
 Diigo
Diigo
Trampy Emacs
I'll confess that although I can use vi, I prefer emacs. If I'm using Linux or the excellent
Cygwin under Windows, it is my text editor (well, actually my environment) of choice.
There's a great plug in that allows you to edit files on remote machines using emacs, called -- amusingly enough -- tramp. The home page is at
http://www.gnu.org/software/tramp/ and if you use Cygwin, you might check out:
http://www-cdf.fnal.gov/~cplager/cygwin.html.
The system relies on ssh (well, technically scp). If you want to edit a remote file you just open up a "file name" like /[theal@www.myremotemachine.com]/home/theal/public_html/index.html and tramp copies it down, allows you to edit the file and then pushes it back to the server when you save it.
Really cool!
Labels: emacs, software
Submit to:
 Del.icio.us |
 Digg |
 Slashdot |
 Diigo
Diigo
Relay Computer
Best Electronics Book Ever!
I want to make sure you have a copy of The Art of Electronics by Horowitz and Hill.
This is hands-down, the best electronics book I've seen in 25 years. The book is a practical approach to every facet of electronics and taught me more about every aspect of design than I had learned before. Not much math past algebra (pity to waste all my calculus and diffeq) but enough to develop intuition about design.
Chapters:
1. Foundations - Ohm's law, voltage dividers, Thevenin's equivalent, capacitors, inductors, transformers, reactance, and diodes
2. Transistors - Switches, amplifier biasing, the Ebers-Moll model, constant current sources, Miller effect, and Early effect
3. FETs - Basic FET circuits, switches, MOSFETs
4. OpAmps - The golden rule of opamps, real-world behavior, single supply operation, feedback, and compensation
5. Active Filters and Oscillators - Active filters, VCVS, state variable, Twin-T, gyrators, switched capacitor, relaxation oscillators, 555, crystal oscillators
6. Voltage Regulators - 723, unregulated supplies, zener diodes, ICs, HV regulators, micropower regulators
7. Precision Circuts and Low Noise Techniques - Precision op amps, amplifier noise, noise measurement, and shielding
8. Digital - TTL, CMOS, Karnaugh maps, sequential logic, one shots, ICs, and pathology
9. Digital Meets Analog - CMOS/TTL interfacing, long wires, A/D and D/A conversion, PLLs. and noise generation
10. Microcomputers - 8086 assembly, I/O, PC bus interfacing, and data communications
11. Microprocessors - 68008 assembly, an analog signal averager design, and support chips
12. Electronic Construction Techniques - Prototyping, PC board fabrication, and housing
13. High-frequency and High-speed Techniques - HF amplifiers, transmission lines, stubs, baluns, AM, SSB, FM, FSK, PWM, and switching
14. Low-Power Design - Batteries, solar cells, micropower regulators, amplifiers, oscillators, and digital design
15. Measurements and Signal Processing - Transducers, standards, bandwidth reduction, and FFTs
The book also contains information on oscilloscopes, math, resistors, schematics, load lines, transistor saturation, LC filters, and some data sheets.
At over 1100 pages this is not light reading, but if you read it, you'll walk away with more than you would at your average 4 year school. Highly recommended. Nothing else even comes close.
Order The Art of Electronics now.
You can also order the student manual that goes with the book if you want details of the lab exercises.
Labels: electronics
Submit to:
 Del.icio.us |
 Digg |
 Slashdot |
 Diigo
Diigo
Surface Mount
I've used a lot of methods to work with surface mount components. I've carefully soldered and I've used the "slop and wick" method to mount tiny ICs to PCBs. I also invested in a hot air station (more on that one day) and I've seen people use toaster ovens for reflow.
Here's a new method I ran across on the Web today:
http://www.reconnsworld.com/griddle_reflow.html shows using an electric gridle and easy to find paste to do surface mount. Interesting!
Labels: electronics, smd
Submit to:
 Del.icio.us |
 Digg |
 Slashdot |
 Diigo
Diigo
Geek Articles
I've been getting the urge to write some longer articles again, so I'm opening the
HotSolder Article Pages. I'll get a link to the right shortly. Look for some new articles soon as well as some "reprints" of other articles I've had on some of my other Web sites.
Labels: article, geek
Submit to:
 Del.icio.us |
 Digg |
 Slashdot |
 Diigo
Diigo
Wireless USB on the Way
I've always wanted to build a USB hub that had a wireless connection to the PC. That would let you have, for example, a laptop connected to a printer and hard drive across the room from you. Or -- a good example in my case -- a USB TV box could sit near the cable TV jack while your computer is across the room.
Looks like my wishes are going to be answered soon:
http://www.belkin.com/pressroom/releases/uploads/01_03_06CableFreeUSB.html. Well... maybe... apparently my wish should have been answered in July, and then September, and here it is October and I still couldn't find one to buy! Hmmmm.... But it will be cool if it does arrive.
Labels: PC
Submit to:
 Del.icio.us |
 Digg |
 Slashdot |
 Diigo
Diigo
More on the Spartan 3 Starter Kit Computer
I promised a bit more about the computer I've built around the Spartan 3 Starter Kit. Let me tell you a bit about the front panel. The CPU is a 16-bit machine with a 12-bit address bus (4K words or 8K bytes of memory). But the board doesn't have enough I/O to actually support this via the front panel. So a little ingenuity was required.
The board has 4 numeric digital displays. These can display hex (if you provide a hex decoder in the FPGA) so that's enough to show a single 16-bit quantity. Each digit also has a decimal point which will become important later.
The board also has 8 toggle switches, 8 discrete LEDs, and only 4 push buttons that you can use. Let's start with the 4 buttons. The leftmost button is predefined to the FPGA's reset line, so it is the reset button. The next button selects the mode of the front panel (there are 6 modes that you select sequentially -- each button press picks the next mode). The second to last button is an "execute" button that means different things depending on the current mode. The final button works as an "enter button" in all modes. Of the 8 LEDs, 6 are dedicated to showing the current mode.
Mode 0 - Register select
In this mode, each press of the enter key changes what register the display shows. The display can show 4 different registers and which one it shows is indicated by which decimal point is turned on. When the rightmost decimal point is on, the display shows the program counter (PC). The next LED signifies the accumulator is displayed. The 3rd LED indicates the "switch" register (more on that in a second). The final LED indicates the instruction register (IR) is displayed.
Note that in all modes, when you press the enter key and hold it down, the front panel does three things:
- It shifts the switch register left 8 bits
- It puts the current 8 switches into the right 8 bits of the switch register
- It displays the switch register (and the corresponding decimal point) until you release the button
So to enter A105 into the switch register, you have to enter A1 into the switches, press enter, and then enter 05 into the switches and press enter again.
Mode 1 - Set PC
Pressing execute in this mode transfers the switch register to the program counter.
Mode 2 - Dump
In this mode, every press of the execute button puts the contents of the memory at the PC into the accumulator and increments the program counter. You can use this to examine memory.
Mode 3 - Load
This is similar to mode 2 except that pressing the execute button puts the contents of the switch register into the memory at PC and increments PC. In addition, in this mode (and assuming the processor is halted) any bytes that show up on the serial port will be entered as though they were entered at the switches. This is a handy way to load an initial program over the serial port (sort of like a paper tape reader).
Mode 4 - Single Step
This mode causes the program to step each time you press execute.
Mode 5 - Run
When in mode 5, pressing execute will start the processor running (or stop it if it is running already).
The two leftmost LEDs are used to indicate status. The very leftmost LED is the Q LED which the program can turn on and off (useful for debugging). The next LED turns on when the processor is running.
This is surprisingly flexible and is pretty quick to operate once you get the hang of it. Of course, you don't want to enter long programs which is why there is the serial port option.
The switch register can be read and written under program control. The program can also read the raw value of the switch inputs. These are mapped, along with the UART registers, to the top part of the memory (FF0-FFF are reserved for I/O).
So that gives you a little flavor of what I do in my spare time. Next time I'll talk about the instruction set (which includes a stack, indexing, and a few other interesting instructions).
Labels: cpu design, electronics, fpga
Submit to:
 Del.icio.us |
 Digg |
 Slashdot |
 Diigo
Diigo
Cheap Power Supply for Experimenters
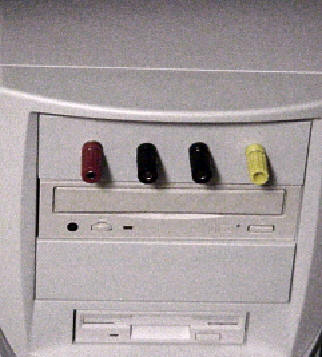
How'd you like a high-quality regulated 5V and 12V bench supply for $8 or less? You have to build it yourself, but you won't even need a soldering iron. Sound interesting? Well, there is one small catch, but read on and you might find you have everything you need already on hand.
Many hams and electronics experimenters have PCs today. An increasing number of these are finding use on the workbench. Many hams program microcontrollers, use a PC-based oscilloscope, or just use the PC to control equipment around the shack. This is becoming even more practical as the resale value of computers keeps dropping. More and more, you'll find it hard to get rid of a PC when you upgrade. You might as well find a use it around the shack.
Inside every PC is a (usually) good quality switching power supply. The exact details depends on the PC, but you can expect to find regulated 5V and 12V often at 200W or more of power. Modern PCs rarely consume that much power, so there is plenty of spare juice for your projects (unless you have a maxed out overclocked supercomputer). The problem is how to get to it.
In this post I'll show you a quick and easy way to gain access to your PCs power supply. Of course, you need to be careful not to exceed the maximum current capacity of the supply--don't run your 100W HF rig from the PC supply! For many projects, however, you can use the +5 and +12 supplies with no ill effects.
Construction is very simple. Just remove an unused drive plate. These plastic plates cover the holes where you would install a floppy disk or a disk drive. I used a 5.25 inch cover, but if you only have a 3.5 inch cover open, that should work just as well. Be sure there isn't a disk drive behind the plate -- sometimes there is a hard drive hiding behind one of these plates.
Using a center punch, mark 4 holes in the plate equally spaced (the picture above has a center line of 21mm and the holes are 30mm apart). Then drill out the holes to fit 4 binding posts. You can use Radio Shack 274-662 (which require a 3/16" hole) or use whatever you have on hand. Mount the binding posts on the drive plate. You should use two black posts in the center 2 holes. It is nice if you can find a red post for the 5V supply and another color post (I used yellow) for the 12V supply. However, if you are buying parts at Radio Shack, you'll probably have to settle for two red posts. My yellow post is a different brand so I had to drill an odd size hole for it.
The next piece of hardware you need is a Y splitter (Radio Shack 278-761, for example). This is a wiring harness that plugs in to the connectors that the power supply provides and ends in two similar connectors. You usually use these when you have run out of connectors and you want to add something else to your PC.
Locate one of the female connectors on the Y splitter and cut it off close to the connector body. Strip the wires back about a half inch. If you are meticulous, you could crimp on some spade lugs or ring terminals to the wires. However, you can also just work with the bare wire. The splitter has two black wires (ground), a red wire (5V) and a yellow wire (12V). Connect these to the appropriate binding posts.
Feed the wiring harness back into the PCs body and reinstall the drive plate. If you can locate a free connector from the power supply, just plug the mating connector on the harness into it and you are set. If you don't have a free connector, don't worry. Find the closest disk drive and gently remove the power connector from it. Replace it with the connector from the wiring harness. Then plug the newly freed connector into the harness. Now the drive has power, and so do the binding posts.
Here's what it looks like ready to install:
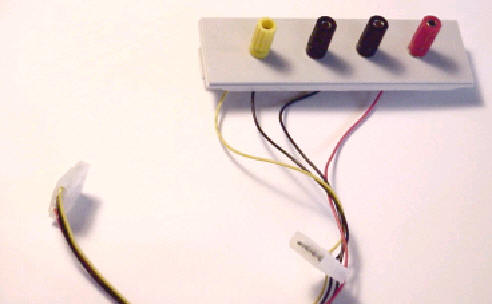
Before your button up the PC, take a look at the power supply's label and see if you can get idea of how many amps the supply can handle. Of course, the PC is taking some of this power, but the trend has been towards lower-powered cards and drives, making most PC supplies quite large for their typical load. Turn on your PC and measure the voltage at the binding posts. Voila! Instant power supply.
There are many things you could do spruce this project up. For example, you could mount a cheap digital panel meter in another drive plate to monitor the voltage or current. You could also mount an inline fuse holder in the wires leading to the binding posts. In particular, if you short something accidentally, you run the risk of damaging your PC. Every time I've done this, the power supply just shut down until I cycled the input power (with the short removed) and there was no other harm done.
Whatever you do, you'll get a useful addition to your bench and one other benefit. Everyone who sees those posts sticking out of your PC will want to know what they are for!
By the way, another good way to get a 5V supply is to cut the end off of a USB cable, find the red and black wires (make sure with a voltmeter) and connect them to some sort of connector or binding posts. This has the advantage of being highly portable. Powered USB hubs can provide 500mA at 5V and many are current limited!
Labels: electronics, hack
Submit to:
 Del.icio.us |
 Digg |
 Slashdot |
 Diigo
Diigo
Online Backup
At work we have a neat program that runs in the background and backs up your hard drive to a remote server. Now you can get the same sort of service at home. A company called
Mozy will backup 2GB of data over the Internet for free. A little program runs in the task bar and can backup when you aren't using the computer or on schedule.
Of course, 2GB isn't enough for a hard drive, but it is enough for your important documents and spreadsheets. If your computer crashes or your house burns down, you'd be glad to have them safe. The data is encrypted so it is private. If you want more storage, they are glad to provide it for a "small fee."
Works great!
Try it out.
Labels: Tips, webapp
Submit to:
 Del.icio.us |
 Digg |
 Slashdot |
 Diigo
Diigo
Google Joins the Online Office Suite Game!
I've been a long time user of Thinkfree (http://online.thinkfree.com) and I've mentioned that before in this blog. However, recently Google acquired Writely and they are now offering documents and spreadsheets online. Honestly, I like ThinkFree better. Besides, ThinkFree has a PowerPoint replacement. However, Google has certain charms too. First, its Google. You figure they won't vanish and your files are probably pretty safe. Second, the Google tools are lighter weight which means they are more likely to run behind firewalls, etc. The Google tools also offer revisions and export to HTML, something sorely missing in ThinkFree. In fact, you can also export Google's documents to Open Office format directly!
Like ThinkFree you can collaborate and publish your documents. In fact, this blog entry was written with the Google word processor. Check out
http://docs.google.com to try it yourself.
Labels: webapp
Submit to:
 Del.icio.us |
 Digg |
 Slashdot |
 Diigo
Diigo
Xilinx Spartan 3 Starter Kit
I bought a Xilinx Spartan 3 Starter kit awhile back for about $100. Great bargain! This board has an FPGA that can hold 10s of thousands of logic gates. Why use FPGAs instead of microcontrollers? FPGAs are real hardware. Say you design 10 PWM outputs in hardware. Then all 10 run at the same time. In a microcontroller, you have to do a few instructions for one PWM and then a few for the other... and so on (or at least, some variation thereof). So even a fast processor quickly gets divided down. Another way to look at it is that if you have a processor running at 10MHz in a loop with 10 instructions, you are effectively operating at 1MHz! With an FPGA everything happens in hardware all at the same time.
I have a custom CPU I designed working pretty well on the board. I'll occasionaly share a little about some projects I've done with the board here on HotSolder.
Labels: electronics, fpga
Submit to:
 Del.icio.us |
 Digg |
 Slashdot |
 Diigo
Diigo
 Del.icio.us |
 Digg |
Slashdot |
 Diigo
Diigo




 RSS Feed