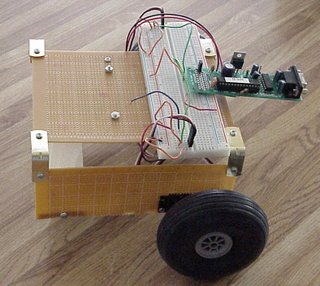
This little robot is made with two perf boards from Radio Shack (one of them cut into two for the sides). This board is easy to work with because it has a grid of holes. It is very easy to make nice straight cuts (or even just score and snap). It is also perfect for drilling exact holes. Basswood and polyurethane glue holds it all together (along with a few screws).
The drive consists of two Futuba RC servos modified for continuous rotation and a caster wheel from Home Depot in the rear. The tires are 2.25" RC aircraft tires.
A 4xAA holder under the top deck powers the motors. The 9V battery on the top is just for the electronics.
The electronics is the GP3 board which has been programmed by the GP3EZ software so programming the robot is simple point and click.
The sensor is a Panasonic IR sensor tuned for about 38kHz. The IR LED is pulsed through a 2N2222 with the GP3's PWM at 32kHz which is close enough that it works. A piece of antistatic foam pushed into a pin header blocks the sensor from seeing the LED directly. When something is in front of the bot, it sees the IR bounce off of it. It would be easy to add more LEDs (for example, two on the corners). The sensors could be paralleled or just connected to more I/O pins.
Here's the software (dumped out to HTML by GP3EZ; the real software is all constructed using GP3EZ's point and click interface):
| Step # | Tag | Condition | Action | Next | Notes |
| 1 | Start | Always | LED Off PWM: 200 freq=32766 | Start IR and reset LED (for when we finish turning) | |
| 2 | MainLoop | Input: XXXXXXX0 | LED On | object | Check IR sensor |
| 3 | Always | Pulse: pin 7 2000 | Drive forward | ||
| 4 | Always | Pulse: pin 6 1000 | Drive forward | ||
| 5 | After 20 ms | MainLoop | Servo delay (20ms) | ||
| 6 | object | Always | | back (set bookmark) | We detected something, so back up a little. |
| 7 | turn | Always | Set Loop A to 20 | Start turning (just under 1/2 second) | |
| 8 | turn0 | Always | Pulse: pin 7 2000 | pulse motors the same way | |
| 9 | Always | Pulse: pin 6 2000 | Inserted step | ||
| 10 | After 20 ms | turn0 (Loop A) | Pause and loop for 2 seconds | ||
| 11 | Input: XXXXXXX1 | Start | If sensor shows clear (high) then go back to forward motion | ||
| 12 | Always | turn | Sensor wasn't clear so do some more turns | ||
| 13 | back | Always | Set Loop A to 100 | Back up for about 2 seconds | |
| 14 | back0 | Always | Pulse: pin 7 1000 | Turn motors in reverse | |
| 15 | Always | Pulse: pin 6 2000 | |||
| 16 | After 20 ms | back0 (Loop A) | Delay and loop | ||
| 17 | Always | {last bookmark} | Go back to caller |
The table is easy to understand. The step number should be obvious. The "Tag" is a label that names a particular step so you can refer to it later. Each step has 3 major parts:
- Condition - This must be true for the step to execute. Many of the steps are marked "always" and some are marked "After xxx milliseconds". These will always execute, of course. Note the lines that work with the IR sensor, however. They only execute when a specific condition is true.
- Action - When the condition occurs, this is what will happen. The GP3EZ can output digital values, PWM, pulses, and do a variety of other tasks as part of the action. If you are connected to a PC (the robot isn't) you can write data to a file or execute external commands.
- Next - When a step executes, this column tells the program where to go next (which is usually the next step).
The note field is just a comment and is ignored by GP3EZ.
Note that the GP3EZ supports looping and subroutines. For example, at the "object" tag, there is a transfer (in the next field) to the tab "back". The notation says that a "bookmark" is set. If you find the back label, you'll see it does several steps and then goes to the "last bookmark." This is nothing more than a subroutine call and return. You can see examples of looping in the object and back routines which generate a specific number of motor pulses.
Labels: electronics, gadgets, geek, microcontroller, robot
Submit to:
 Del.icio.us |
 Digg |
Slashdot |
 Diigo
Diigo


 RSS Feed